TR: Big Wall Epic at the Grotto, 2008-03-16
Climbing Team: Tad Hunt and Nutjob
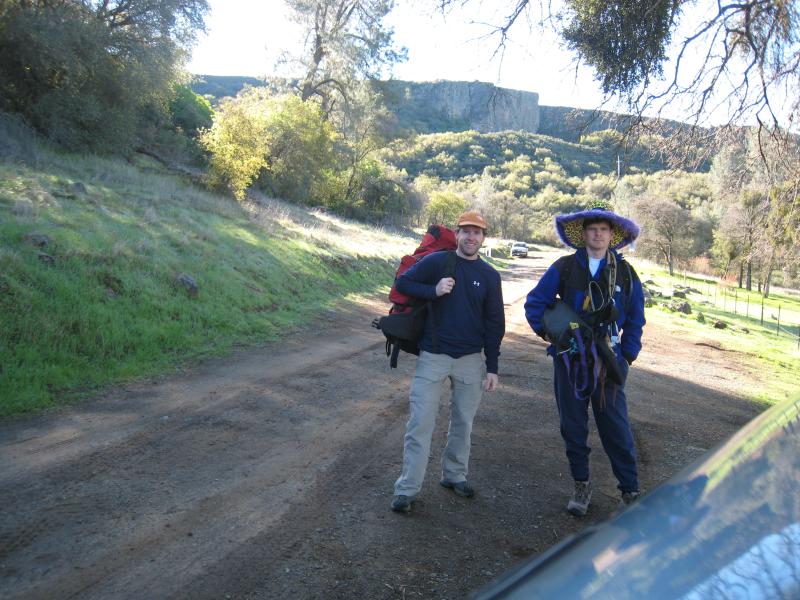 Figure 1: Geared up to start the heinous trek to the cliffs in the
distance. Tad (L), Nutjob (R)
Figure 1: Geared up to start the heinous trek to the cliffs in the
distance. Tad (L), Nutjob (R)
Sunday, March 16, 2008 began as many other climbing days do. A crack of
dawn start, followed by breakfast and coffee on the bleary drive to the
ultimate destination. This day began no different, but as you will
shortly see, it turned out to be an epic trip. Without the combined
expertise gleaned from years of climbing adventures, Nutjob and I might never
have made it back alive! The approach was eventful, but I won't saddle
you with the painful bits, except to mention posion oak, steep hills, bats,
and scrambles over steep, loose, moss-covered talus piles. Oh yeah, and
you wouldn't believe the distance and committment. The trek took us
almost 30 minutes from car to base. Phew!
 Figure 2: After hacking through the jungle to the base of the big-wall.
The first objective accomplished, we unloaded our gear at the base of the wall
and scoped out our line. The area was pristine, we must be almost the
first climbers ever to visit this remote location. We started out
swapping leads on an easy 5.9 warmup to get the blood flowing, then headed
over to our first objective:
Trigger Finger (45' 5.10a J3 II).
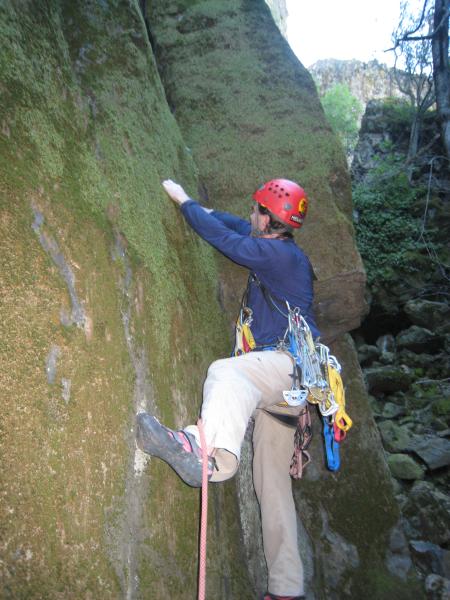 Figure 3: Beginning the possible FMA on the standards setting Trigger Finger
(40' 5.10a J3 II)
Figure 3: Beginning the possible FMA on the standards setting Trigger Finger
(40' 5.10a J3 II)
We found the route in horrific condition. It required the utmost level
of commitment from all involved. We have reason to believe that we did
not make the FMA (first moss ascent) of this stellar line as we saw traces of
bones and grey clumps of hair dribbling out of the crack. Perhaps the
last party wasn't so fortunate. We gave this climb the high end
J3 rating -- Jamestown Grade 3. If this same climb was in a more
well known area, it would rarely be repeated due to it's loose and mossy
nature. Our team however excelled on such terrain.
The climb is committing, with moves through moss inches deep, and initially
poor protection. I say this because my first way-undercammed placement
fell out as I neared the top due to a bored Nutjob flicking the rope back and
forth. So clearly this must not be a route for the weekend warrior with
no guts. It takes a firm resolve to make those moves off the deck
through the moss and work your way up to the crux.
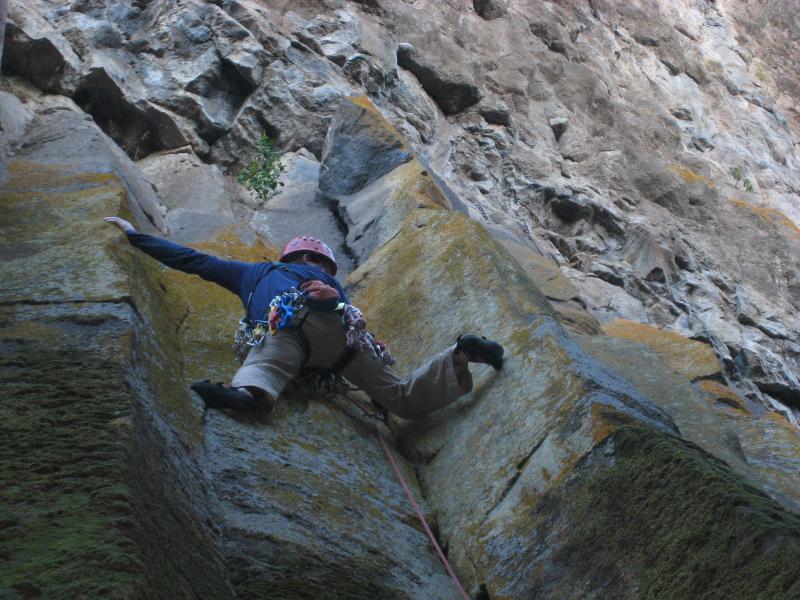 Figure 4: Tad committing to the crux, high on the route, runout with gear
far below at his knees
Figure 4: Tad committing to the crux, high on the route, runout with gear
far below at his knees
Now, the crux of the climb is many (at least four) feet of holdless runout
climbing above a bomber cam placement. You can see how committing it
must be, dicy foot placements on basalt nubbins and just the right touch of
counter-pressure to keep it all in place. Finally, after several moves
of this type, I landed a bomber hand jam, slammed in a #3 Camalot, and ran
it out to the top on easier terrain. Snap! I onsighted this
sucker. Boo-Yeah!
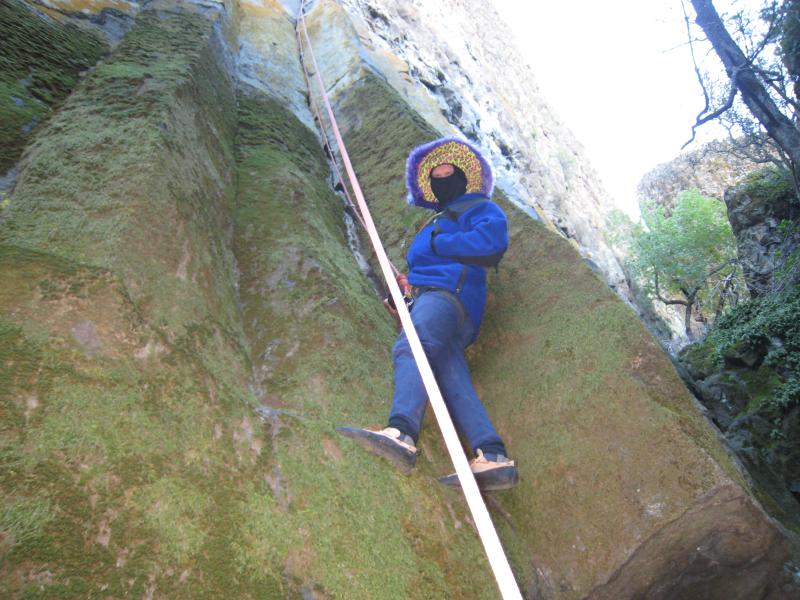 Figure 5: Ninja-Nutjob following Trigger Finger
Next up was Nutjob, to follow this difficult project. As I was climbing
the temperature must have dropped into the very low digits. Digits such
as '50' wouldn't be too low to contemplate! Here, shortly after the
opening moves, Ninja-nutjob must stop to warm practically frost-bitten
hands. What warmth lingered in the air was rapidly consumed by the
chilly basalt. Combating the rapidly worsening weather with aplomb, he
topped out shortly thereafter and made the sketchy rappel off of two bomber
bolts and chains.
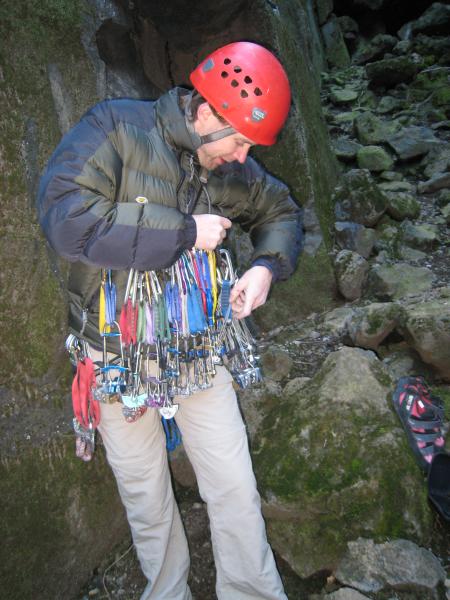 Figure 6: Tad racking up for the main event
Now that we had easily knocked off two extremely difficult climbs, it was
time to move on to the main event. The possible FPLA (first
porta-ledge ascent) of a somehow inviting yet nasty finger crack by the name
of
Rawhide (50' 5.10d C1 J4 VI). While we encountered much
evidence of previous ascents of this notable crack, we did not encounter
anything to indicate that other parties had bivied on the route
before. Therefore we claim this possible FPLA. This ascent would
be a glorious badge to bolster our incredible big wall resumes with. I
racked up for the first lead on this as the temperature dropped. I
didn't risk frostbite by exposing my hands to the cold rock and metal of the
rack.
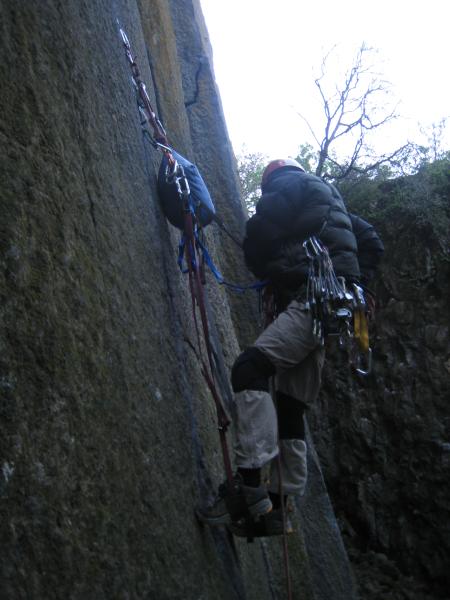 Figure 7: Tad getting ready to deploy the portaledge during the
possible FPLA of Rawhide (50' 5.10d C1 J4 VI)
Figure 7: Tad getting ready to deploy the portaledge during the
possible FPLA of Rawhide (50' 5.10d C1 J4 VI)
Shortly after racking up, I aided the first twenty feet, taking many
minutes to accomplish this. I blasted in an anchor and hauled up
the portaledge as fast as I could. We anticipated an epic storm
would shortly roll in from behind the mountain and catch us
unprepared. We based our decision on the clear blue sky and gut
feel. Luckily due to our great planning skills (honed over
count-less days on other walls), we were able to hand-to-hand-haul the
ledge up (as in he handed it up to me from the ground). This
eliminated the time it would have taken to setup the usual 3-1 haul
normally required for the enormous loads we had with us for this type of
remote climbing. This was a significant factor in making sure we
were safe and secure before the storm hit.
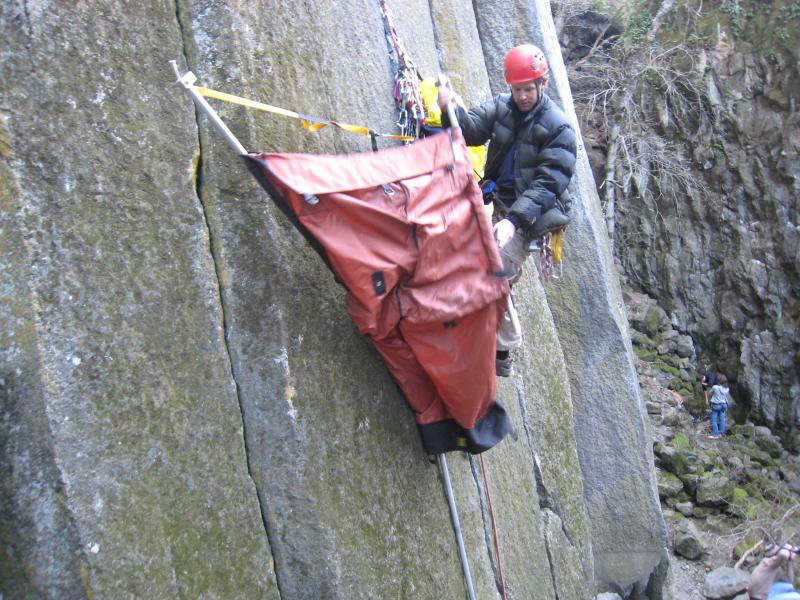 Figure 8: Tad's first portaledge deployment during a multi-day lull in
the weather
Figure 8: Tad's first portaledge deployment during a multi-day lull in
the weather
 Figure 9: Deployment success (mostly)!
As I just jumped into this big-wall adventure unprepared, it fell to me
to learn how to deploy the portaledge while the terrible weather never
materialized. For my first deployment, I must say, it went quite
well... Except for the fact that I couldn't seem to get the floor
level. I had some sort of twist in the frame that no amount of
adjustment could seem to get rid of. Finally, after much grunting,
I got the ledge deployed. Just in time too, because the
threatening weather never materialized. I bivied for a few
minutes, then it was time to pack it up and hand the lead over to
Nutjob. He was tasked with rocketing us to the summit, and the
finish to the FPLA.
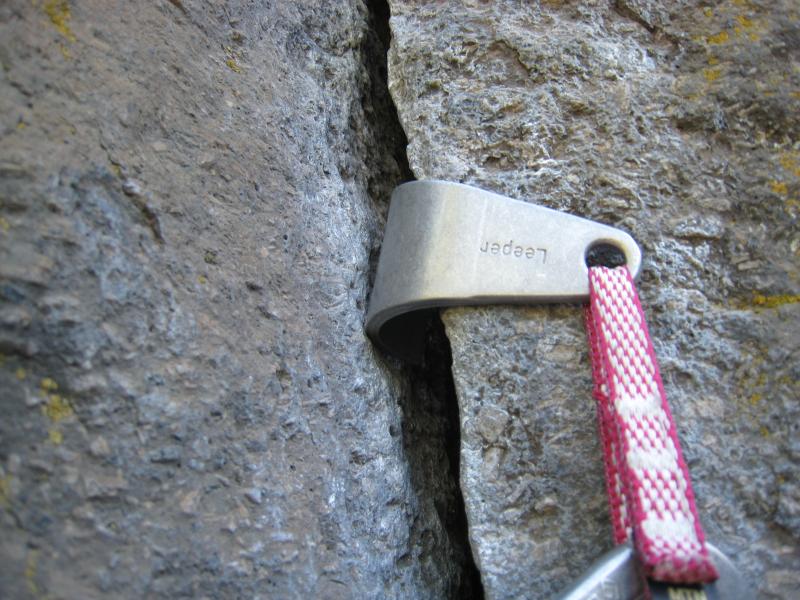 Figure 10: Nutjob's dicy camhook placement during the FPLA
Nutjob warmed to the task. He flew up the crack, aiding like a
madman up this perfect splitter finger crack. Using the Metolius
easy aiders for the first time, he made placement after placement off of
what in normal aiders might be the second or third step. Steller
performance! He linked a blank section with the camhook seen
above. Talk about a committing move, he might have fallen several
feet had the placement blown! We were travelling light, so we
didn't have any duct-tape to hold it in place. He just had to
commit and go and hope for the best. It all worked out, and about
40 minutes later, after a mandatory free section to top it out, he was
building an anchor so we could run laps on toprope. Let me tell
you, that crack shut me down, I had to hang several times from a sketchy
bomber 3 bolt anchor because the moves were just so hard. I don't
think anyone could ever free climb that thing. After my awesome
performance, Nutjob ran a lap on it. He got it clean, but climbed
the 5.10b variation by judicious use of another crack within reach just
to the right.
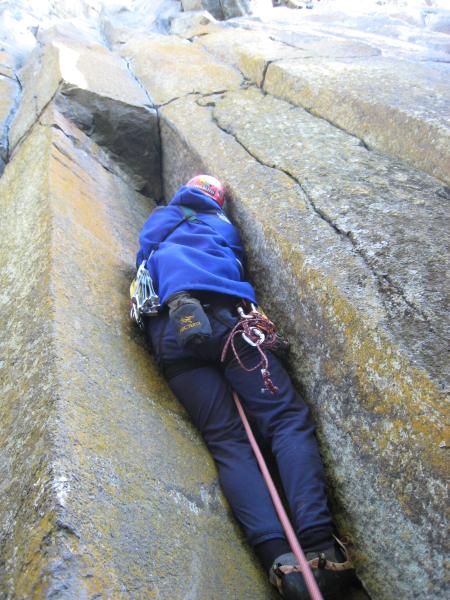 Figure 11: Nutjob heading up the 5.10c to the left of Rawhide
Following our successful possible FPLA of Rawhide, Nutjob decided it
was time to head up the 5.10c just left of Rawhide. The climb
begins with some awkward moves through a flaring chimney, followed by
a strenuous move to get established on the face above the roof.
From a tenuous stance there, you get a placement in the tiny crack
above the roof before committing to several tough moves diagonaling
up-and-right to a shallow hand jam and another placement. Next
you get strenuous moves further up-and-right to a bolt, then holdless
horror for a couple of tough moves into another crack, where hands are
too pumped to hold on. Nutjob took a couple of long 3-6 foot
whippers here, onto dubious fixed protection (a 3/4" bolt of unknown
provenance. It looked fine but might have had micro-fractures!)
before latching the hold and moving up on slippery thin jams before
getting in another piece of pro and gunning it for the top.
Yee-Haw.
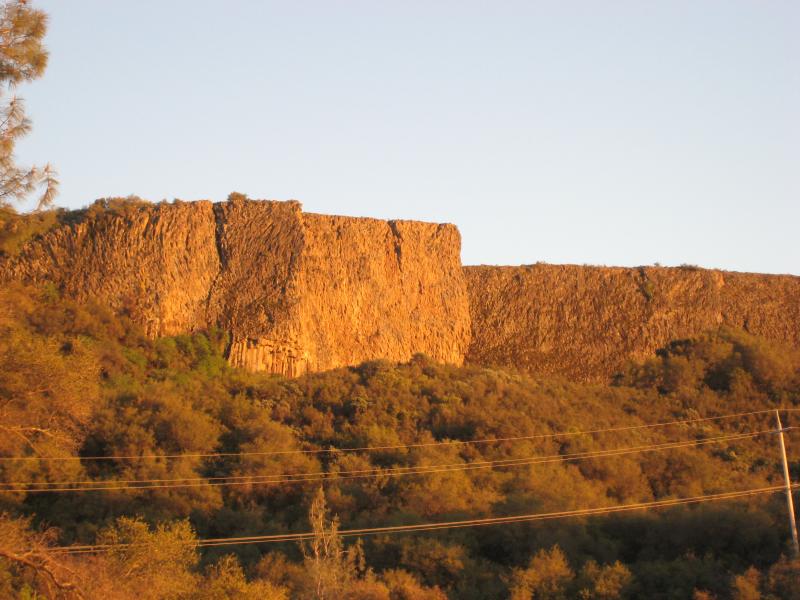 Figure 12: Looking back at our objective in the waning light after
a successful day
Figure 12: Looking back at our objective in the waning light after
a successful day
Finally, we had enough. We fought the wall, and won. At
least this time. After a rough trek back to the car,
downclimbing the same third class terrain encountered on the way in,
we made it back to the car in time to be rewarded by the beautiful
sunset illuminating the cliff.
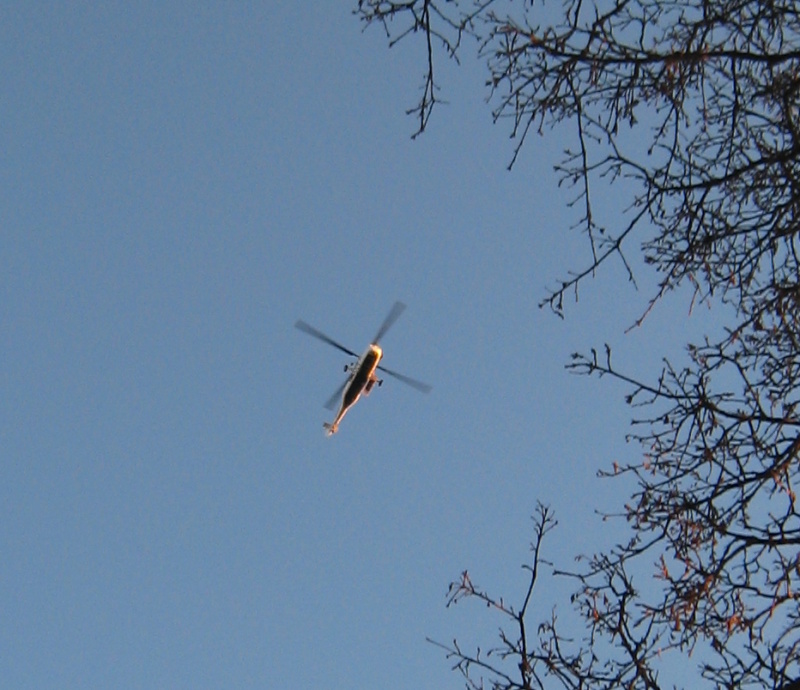 Figure 13: This helicopter was not rescuing us.
However, all was not well in our world. As we contemplated the
cliff, our would-be rescuers arrived. Don't know how they
found us, but luckily our hectic signaling to wave them away
worked. Soon enough, it was nothing but a dot on the horizon
as we began the epic hours long drive back to the Bay Area. That however,
is another story.
-Tad Hunt 2008-03-18